

Brittany Blair
Summary

The Night Train is a level design project I created in Unreal Engine 4. This level revolves around a train conductor who works the night shift. At the end of their shift, they get stuck at station 411. For this project, I had the guidance of a professor, at the Academy of Art University for this project. I had produced most of my projects using Unity and C#. I found this project to be an incredible learning opportunity. My previous use of the Unreal Engine was before I had any knowledge of C++, and I was eager to see how it would help me better understand the engine. Thankfully I was diligent enough to document the project so that I can share the experience here.
Short promotional animation of the level.
The Concepts
Concept art provided to me by the Academy of Art University Game Department.


The two images above were the concepts that I received to base my level design. The first is the train station that looks like a tragic crime had taken place. The lighting is dramatic, and there's a clear sense of tension in the image. The second is a basement with some eerie lighting and lots of equipment. The basement looks like a utility room that appears almost unfinished when contrasted with the train station. My task was to create the level as close to the references provided while improving the level's design.
Pre-Production Package
The pre-production package I prepared for this level consists of a Walkthrough, Asset List, Reference Sheet, Timeline, and a top-down map. All of these documents will be available in a downloadable link at the end of this blog post. The pre-production phase of this project lasted two weeks. I was able to create a story for the possible events that had taken place at this train station.
Walkthrough
The first thing I worked on was the level walkthrough. I started with developing a captivating story and location to the level. I wanted to be as descriptive as possible to refer to this information whenever I found myself stuck. The walkthrough also includes character information, Mission objectives, Puzzle sequences, and a step-by-step breakdown of the player's happiest path through the level.
STORY
The time is three in the morning, and you work night shifts conducting the subway train. You had called the end of the line one station back. If there aren’t any sleeping passengers aboard, then your work is done. You hear one of your co-workers checking in on the walkie. For some reason, there is no response to her check-in. You’re nearing another station when the lights inside of the train flicker. You hear a gritty static emerge from your walkie and the broken voice of your co-worker. You feel the train shake and a sharp squealing sound as your headlights flicker. Right before the headlights on your train shut off, you see something cross the tracks in a blur. It moved so fast you couldn’t tell if it was a small child or some animal.
The train loses power and rolls to a stop at station 411. It’s usually empty and somewhat ominous at this time. But the scene you see outside the train window is darker than you have ever seen before. At the top of the staircase, you can see what appears to be a pool of blood leading down to the station lobby. Unable to get your train back up and running, you have no choice but to make your way out of the station on foot.
Taking your walkie, you go to search your train car for passengers. You hear the words of your co-worker come through. Their train is stuck on the tracks somewhere deep in the tunnel. When you try to speak to them, they tell you they can only hear syllables. Hopefully, you can get out of here alive, even though it looks like someone had died trying to do that same thing.
LOCATION
The game takes place inside a modern train station on the outskirts of an urban area. The station has old white fluorescent tubes attached to the walls and ceiling to light it up. Along the walls of the boarding platform are metal benches and a few trash cans. The train pulled into the station reflects a distorted version of the world around it. The once white subway tiles have lost all sense of shine, now caked with dirt and grime, built up over the years of neglect. Scattered along the walls are Graffiti tags. The ground littered with newspapers, takeaway coffee cups, and the spatter of blood leading down towards the stairs.
The staircase has trails of blood streaking down the steps. Evidence of dragged bodies, maybe even multiple people. The sound of dripping echoes in the abandoned station lobby and the hum of the fluorescent bulbs get louder the nearer you are to them. In the center of the station lobby, there’s a gurney still dripping with blood. Desperate handprint stamps are on every wall and door, and yet there are no bodies, limbs, clothes, or other evidence to suggest what may have taken place here. The ticket booth doors shut, and inside is another radio, a computer, and a ring of keys. The usual exit of the train station is a staircase that leads up to the world above. Crashed into that exit is an ambulance. The back of the ambulance doors are open. Inside is a similar scene to the one display in the station lobby.
Besides the lobby vending machine is a locked door. It leads down into a storeroom positioned below the train’s tracks. The room is empty and untouched by the devastation above. Along many of the walls are shelves filled with cleaning supplies. There are a few large lockers and maintenance tools scattered around. On the right side of the staircase is an open area. Along the adjacent wall of the stairs is a map of the tunnels. Marked with a push pin is your current location. Directly in front of the staircase is an electrical box and the locked door leading to the maintenance tunnels.
Asset List
My asset list document has a collection of different required elements for this level. The document includes scripts, 3D models, Programming needs, Sounds, Visual Effects, and more. Throughout the project, I found myself referring to and altering as the project evolved. This list was also a good resource for me when I thought that the level lacked something visually or felt too empty.
Timeline, Reference Sheet, and Top-Down Map
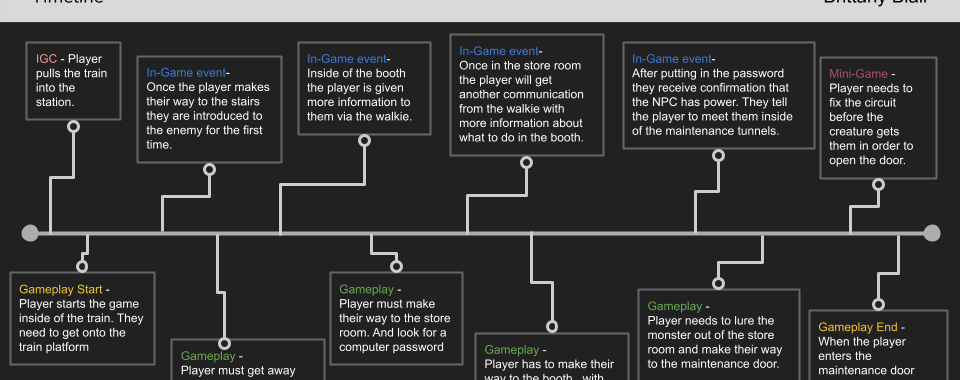
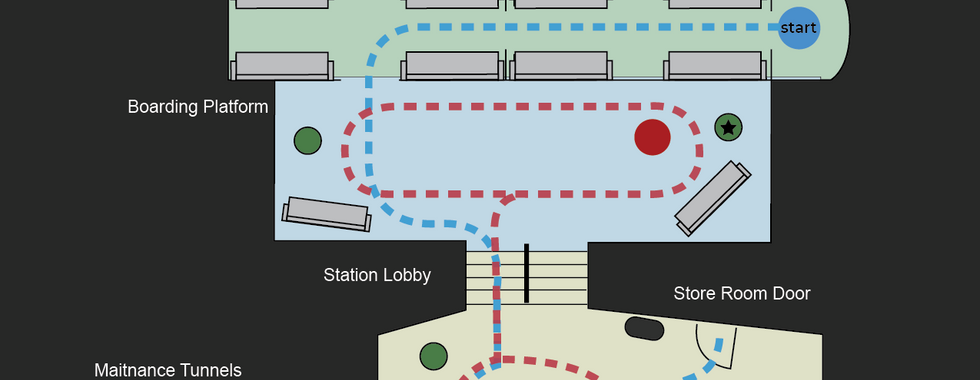
Reference sheet, timeline, and top-down map for the level.


For my references, I wanted to capture a mood that felt run-down and unkempt. As though the station is further away from downtown and not as well maintained due to underuse. I also wanted my lighting to have stark white fluorescent bulbs to produce an uncomfortable mood. The lighting of the station would also contrast to the warmer dull yellow lights for the basement.
In the timeline document, I color-coded the different event types to visually organizing the flow. On the bottom of the timeline are all the gameplay events and above the line are cutscenes, In-game events, and puzzles.
For the top-down map, I wanted to make the shape of the spaces stand out while also keeping close to the concept art. I made each area have a circular flow to the player path to encourage exploration. The design created directions to escape the fictional creature chasing them in the final version of the game.
Level Production
Each time I worked on the project, I versioned up and documented the changes made between each version of the level. The level production phase lasted three weeks. Each week I focused on different aspects of the level's design while altering and improving the previous additions based on feedback.
Blocking the Level I
In the first version of this level, I focused on the shape language of the main spaces in the game. I used the top-down map as my starting point. All of the models, walls, and floors were modeled in the engine using geometry brushes. To build the level to the proper scale of the average human, I imported the third-person character default mannequin into the scene. Using the default mannequin as a reference for scale allowed me to accurately build doorways, scale the height of the walls, and adjust the spacing and length of the staircases.
After an addition to the level, I would play the scene and walk around using the first-person character and take note of anything that felt off or suspended my belief in the reality of the space.
The Night Train level Top down map and progress screenshots for the first pass.


While working on the level's shape, I changed a few features of the level's original design. I altered the train platform room to funnel towards the stairs. I thought the shape language of the train platform needed more visual direction and guiding lines leading towards the entrances and exits. I added four pillars to the train platform to visually break up the space and repetitive design of the train's windows. I also decided to raise the height of the ceilings in that area to allow the light to dissipate and make space feel larger. These decisions helped in making space feel more realistic and functional.
Blocking the Level II
For the second iteration, I focused on constructing the player path and maintaining scale. I blocked in large objects that help to shape the playable space more dynamically. I wanted to have a circular flow to the player's pathways in all the main areas of the level.
I used geometry brushes to model benches, standing shelves, and other pathway obstructing props present in the concept images. I used the third-person mannequin as a reference for height and scale. After modeling, I converted the geometry brushes into static meshes. So I could populate the level with multiples of the same object in a more cost-effective way. When I wanted to adjust or alter a prop, I could edit all the placed props of that kind at once or replace all the meshes without repeating the process every time.
While populating the level with larger props, I was constantly playing and testing out the look and feel of the levels scale. Sometimes found that seeing a mesh in the first person made the scale would feel wrong. Fine-tuning every step of the way made the 3D space believable. Regardless of the perspective.
After blocking, my next objective was to start working on a popcorn trail that mirrored the steps written in my walkthrough. Each popcorn trail element needed a trigger box and a text renderer. I placed 15 popcorn events throughout the level. Each text render object described the event that triggered at that point in the game.
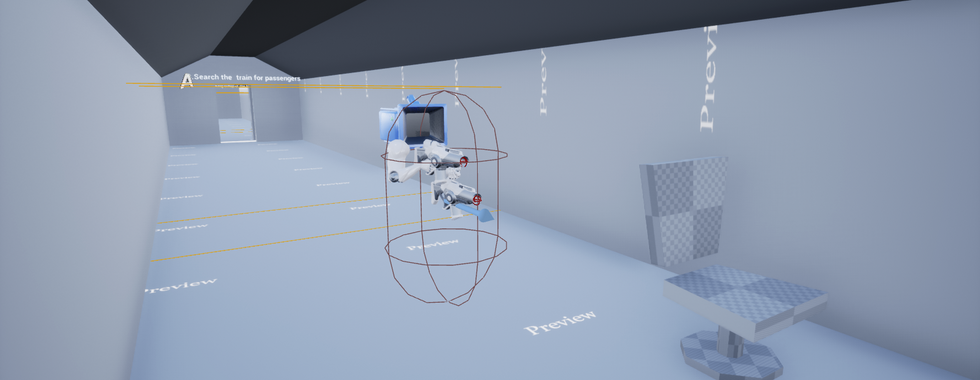
The Night Train level second blocking phase screenshots.


Instructor feedback
"The space feels good so far! I like the direction this is going. Everything is a good scale and the flow is good. Now you should just concentrate on building out the space you have some more. With that in mind, I have two suggestion. One you've probably already thought of and one that maybe you haven't.
1.)Add a wall and doorway to the front interior of the train to create a cab for the train conductor. Also add in seating and support poles to the rest of the interior of both train cars. Make sure they're pushed back far enough to the wall so that it's still easy to move through the space.
2.)When you come down the stairs into the storage area, block off the path to the immediate right with a fence that you can see through. You can put an object or something in there that's of interest to the player so that they continue to explore the space and find the path into the area behind the stairs. This makes better use of the space."
- Jason Weesner
Blocking the Level III
For the third iteration on the level, I focused on implementing feedback, adding more details to the environment, and expanding the popcorn trail. At this point is where I started adding simple blueprints to the project to get the popcorn trail functional when walking through the level.
The first thing I did was implement the feedback I had received from my instructor. I thought that the feedback I received about the utility room and a gate was an idea I could expand upon if I had enough time. I also added more detail to the level, such as fully modeled trash bins. Fuses for the final puzzle doors. Interior seating and handrails in the train. A computer and other equipment in the ticket booth. And finally, a control panel at the front of the train.
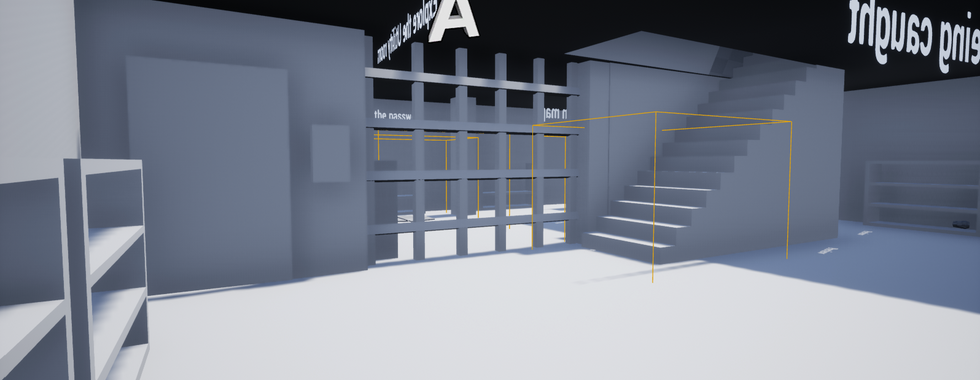
The Night Train level third blocking phase screenshots.


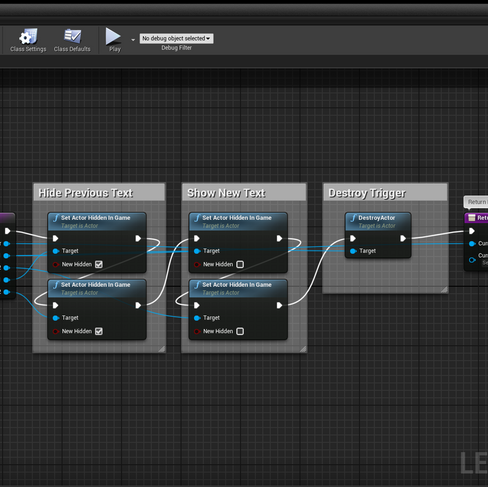
At this point, I felt that I needed to get some simple functionality into the popcorn trail to get it working. I created a function in the level blueprint. That takes in the new popcorn event's trigger, text objects, and the previous event's text. Once the next trigger collides with the player, the function hides the previous event's text. Then it reveals the hidden text for the new event and destroys the trigger object the player just collided with. Afterward, the current event's text and the next popcorn event will use that output to repeat the process. This first iteration of the popcorn trail didn't account for conditions, but it was a good foundation for the changes to come.
The Night Train Level Blueprint progression screenshots.


Lighting & Animation
Now that the level had more details and space was coming together. I started working on the lighting and beginning to insert animations. At this point, I started having fun with designing the level. I have a strong background in film and animation that gave me a lot of creative insight into how best to light the scene to match the mood. I also had a good idea of what I wanted my animations to look like ahead of time, and it was a lot of fun to put them together. I found that when I started looking at the scene from the perspective of an animator. I got a better understanding of the level design concepts I had been learning. It allowed me to view the level From a more creative and objective perspective. From this point forward, I began to make small changes to benefit the presentation of the level layout for clarity and user guidance in ways I hadn't considered before.
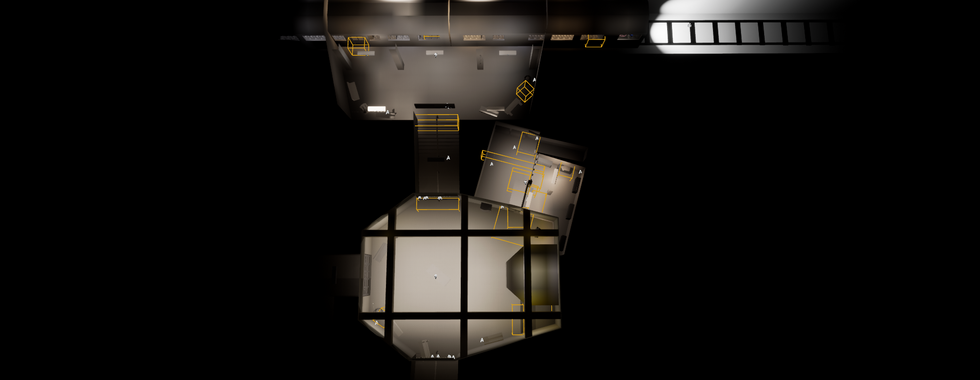
In addition to the lighting, I implemented some changes to the level's design. I added a section to show the rails in front of the train. I also added a caged-off section to the train station lobby to incorporate the gate from the utility room into other parts of the level.
Lighting and Animation, first phase screenshots.


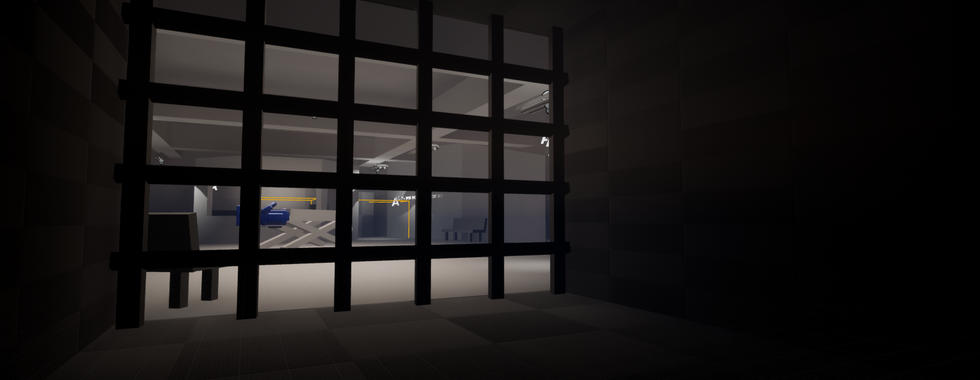


For the lighting, I wanted to contrast the different areas with warm and cool lights. The lobby area of the train station has stark white lights, while the utility room has softer yellow lighting that contrasts the tension of the lobby. For the train, I decided to mix the two colors to represent the narrative. On the train, the player has no idea what is happening, and they aren't sure whether they are safe or not. The mix-matched lighting reflects that internal conflict and confusion.
The Night Train intro cutscene.
The animation I added in this iteration was the introduction cutscene. In the intro, the main character is conducting the train. Suddenly the lights are flickering, and the train comes to a screeching halt on the tracks at station 411. I animated the scene inside of Unreal's sequence editor and added an event in the level blueprint to play that scene at the start of the level. I also added animations for the various doors to open when the player hits a trigger placed in front of it.
Instructor Feedback:
"For a first person version of this assignment, the scale of the area feels really good and the overall size is good too. Some feedback:
1. Love the opening IGC and what you've done with the train interior! 2. If I was making this into a finished level, I would make the lights in the subway car flicker when you get to the signpost talking about something on top of the train. Maybe even make the lights go out. 3. In the stairs going from the platform down to the ticketing area, you may want to consider getting rid of that light in the stairwell. The contrast between light (the platform), dark (the stairwell), and light (the ticketing area) would provide a moodier and better contrast to help lead the player. If you want to try a flickering light here, this would also work. 4. In the basement area, get rid of the light in the back since you already have the lit area on the other side of the gate. Sometimes it's good to have darkness as part of the player path to heighten tension. 5. Still in the basement, add another fence, but have this one open. This helps with the logic of the space. 6. How exactly would you escape the basement if the creature comes down the stairs? Perhaps make a place somewhere in here to hide until the creature leaves"
- Jason Weesner
Final Pass
For the final pass, I focused mainly on integrating the feedback I received from my professor, fixing any lighting issues, and adding more animations to the level. There was a lot to get done at this point, and I had one week left to complete it. I also needed to alter the blueprints in this final pass to integrate the fuse finding puzzle at the end.
Final level blueprint screenshot.

I decided to prioritize my list of tasks by what is most important and what I consider extra. The most important task was to make sure the level functioned as intended with the blueprints. It took up most of my time, but in the end, everything worked as expected. I added conditions to the popcorn events and implemented the fuse hunt puzzle.
My next task was to fix any lighting issues in the level, starting with the feedback I received from my professor. I also had to go into my project settings and adjust the rendering options to fix an exposure issue that my professor had.
Finally, I had to create an animated in-game event for when the monster is climbing on top of the train while the player is inside it. It was the last task I had time for, but it added suspense to the experience and helped to set the tone for the rest of the level.
Final level progression screenshots.


Walkthrough video of the level.
Post-Mortem
Though there are still things that I wish I had been able to implement in the final version. I am proud of this project for what it is. It was a huge learning experience for me, and since this project, my level of design skills and knowledge of the Unreal Engine has improved. The level design projects I finished after this one ended up leagues ahead of where this project ended.
If I were to start this project over again. I would change the decision to work exclusively in the level blueprint. In all of my following level design projects, I rarely touch the level blueprint, and each element in the level is a separate blueprint. It's a much easier workflow for the long-term and makes changing and adapting specific objects or events way easier.
Check out my main blog page to read about my other level design projects. I'll be posting about them shortly after this is released.
Documents
Walkthrough PDF
Asset List PDF
Comments